Saleae Logic Analyzer
This section describes how to download, install and test the saleae logic analyzer.
Download
Download the program for your operating system from the official website here.
See also
For more information, see the installation instructions for your operating system. The section Linux Installation gives more information about the Linux installation.
Linux Installation
When you download the saleae logic application for GNU/Linux, you get an AppImage file. This file can used directly after allow executing this file as a program as described in the installation instructions. Another way to download the Logic2 application is to use the command line tool curl.
Demo
Install curl
sudo apt install curl
Download with curl the newest application
curl -L <downloadLink> -o <downloadFileName>
curl -L "https://logic2api.saleae.com/download?os=linux&arch=x64" -o Logic-2.4.10-linux-x64.AppImage
Add AppImage to applications
To use the app as usual with a symbolic constant in the applications, further configurations are required. You can use this schematic for every AppImage application. Follow these steps to configure your application:
With the option to make an update easier, create a new folder in the directory of your choice.
mkdir <newDirectory>mkdir ~/Documents/saleaeMove the downloaded AppImage file into the new created directory or download it directly with curl in the new directory:
mv <source> <target>mv ~/Downloads/Logic-2.4.10-linux-x64.AppImage ~/Documents/saleae/Change to the new directory:
cd <path/to/new/folder>cd Documents/saleae/The moved file should be visible file. You can check it with the command
ls. Change the access permissions for user with:chmod +x <executable>chmod +x Logic-2.4.10-linux-x64.AppImageInstall required additional packages
Note
This step is only needed for the saleae application. For other applications, install the corresponding defined requirements.
Install FUSE
Ubuntu (>= 24.04):
sudo add-apt-repository universe
sudo apt update
sudo apt install libfuse2t64
Add additional udev rules file
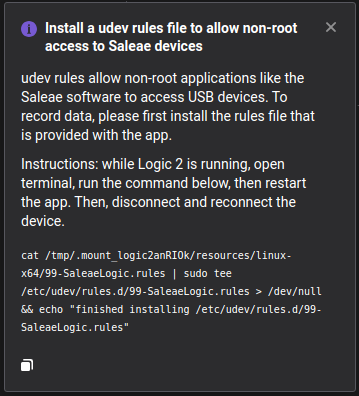
This rules file is needed to allow non-root access to Saleae devices. Download the
99-SaleaeLogic.rulesfile and move it into the directory /etc/udev/rules.d.sudo mv ~/Downloads/99-SaleaeLogic.rules /etc/udev/rules.d/Start the application to test the installation
Important
Starting the application in Ubuntu 24.04, you need to add the
--no-sandboxargument to the command as described at Issues with Running AppImage file../<executable>./Logic-2.4.10-linux-x64.AppImage --no-sandboxWarning
When the application displays an information pop-up with the title Install a udev rules file to allow non-root access to Saleae devices execute the command as described in the window or repeat the task 5.2.
Pop up window
Create a symbolic softlink to make your settings more modular and more comfortable for updates.
ln -s <APPNAME> <LINKNAME>ln -s Logic-2.4.10-linux-x64.AppImage logic2.AppImageCreate a new file to add a desktop link application
touch ~/.local/share/applications/<appName>.desktoptouch ~/.local/share/applications/logic2.desktopAdd the desktop entry link content
Download
logic2Icon.pngfor the official application icon. Move the icon into your directory to have all data together. Add the content below to the precious created file:[Desktop Entry] Version=x.x.x Type=Application Name=appName Comment=Application Description TryExec=<Path/to/App> Exec=<Path/to/App> Icon=<Path/to/AppIconImage> Actions=Editor Keywords=<keyword1>;<keyword2><...> StartupWMClass=<executable> X-AppImage-Version=<Version>[Desktop Entry] Version=2.4.14 Type=Application Name=logic2 Comment=Saleae Logic 2 TryExec=/home/user/Documents/saleae/logic2.AppImage Exec=/home/user/Documents/saleae/logic2.AppImage --no-sandbox Icon=/home/user/Documents/saleae/logic2Icon.png Actions=Editor Keywords=logic2;2;saleae; StartupWMClass=Logic X-AppImage-Version=VersionNote
If the application is not visible, a link is not correctly set.
Add terminal command
To open the the application in the terminal you have to use a correct path to the application.
If you want to use it like a shell command, several options are possible.
One possibility is to add an alias into the .bashrc file, which is located in your home directory.
An advantage in this case is to use the same link as in the *.desktop file to access always to the same application.
That promotes the reusability and easier updating of the application for your system.
To make the alias more secure, the if condition checks whether the path exists.
Of course you can refer to the *.AppImage file without using the desktop link.
Add to the .bashrc file in your home directory:
<_APP_DIR>=<path/to/your/application> if [ -d ${<_APP_DIR>} ]; then alias <newName>=${<_APP_DIR>}/<commandSubstitute> fi_LOGIC2_DIR=/home/user/Documents/saleae if [ -d ${_LOGIC2_DIR} ]; then alias logic2='${_LOGIC2_DIR}/logic2.AppImage --no-sandbox' fiSince the change in the file will not be reloaded automatically, you have do it yourself. You have two options:
Use the
sourcecommand:source ~/.bashrcClose the terminal with
exitand open a new one with Shift+Alt+T. The new terminal loads the updated .bashrc file automatically.
Update Logic2 application
If a note pops up with a request to update your system, download the new version and follow the steps from 2 to 5 in Add AppImage to applications. Use the same LINKNAME to update the link to the new application version. If everything works well, you can delete the old app version.
Route Saleae to Virtual Machine
The saleae device requires two filters to use it in the virtual machine.
At first, the device with the name Cypress WestBridge is not connected to the logic2 application.
After linking and authorising in the application, the name will be changed to to Saleae Logic (Pro).
Add both permanently to your virtual machine by following the instructions under How do connect a usb port permanently to the virtual machine?.
USB Settings
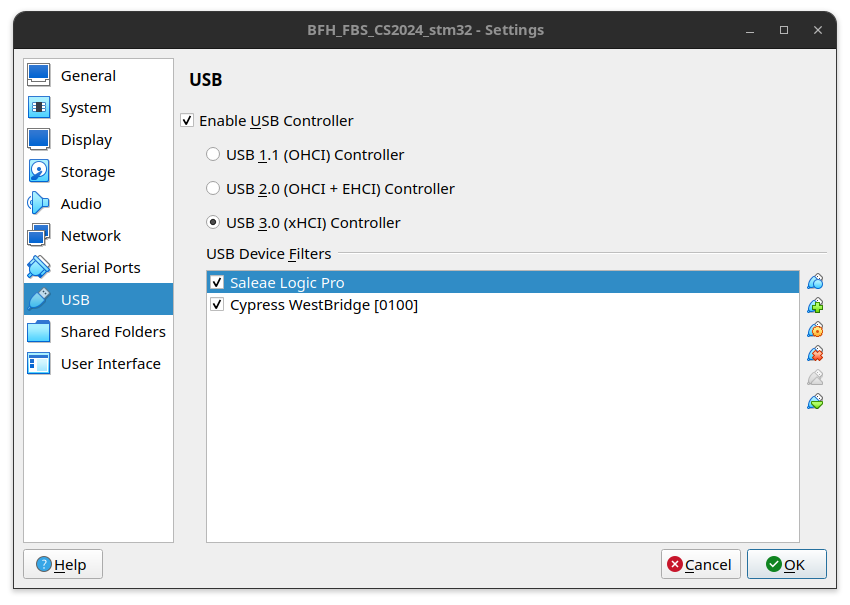
USB Settings in Virtual Box for Saleae device
Logic2 Tutorials
Saleae offers short tutorial videos to make it easier to get started with the logic 2 application.
Capturing data
In this tutorial video, you can learn how to read in data with your saleae.
Tutorial: Capturing data
Source from YouTube: SALEAE Logic 2 Tutorial - Capturing Data
Organize Workspace
Tips and tricks for convenient and customised use of the logic 2 application.
Tutorial: Organise workspace
Source from YouTube: SALEAE Logic 2 Tutorial - Organize your Workspace
Triggers
Learn how to use triggers with the saleae to start and stop a measurement with an external signal.
Tutorial: Configure data trigger
Source from YouTube: SALEAE Logic 2 Tutorial - Triggers
Protocol Analyzers
Serial communications protocol are not so easy to debug with the MCU. The logic analyzer can read and display the data of a serial communication. Find out how to use it here:
Tutorial: Analyze captured data
Source from YouTube: SALEAE Logic 2 Tutorial - Protocol Analyzers
Tips and Tricks
Voltage Level Settings
Info
Voltage level settings only for saleae logic PRO devices.
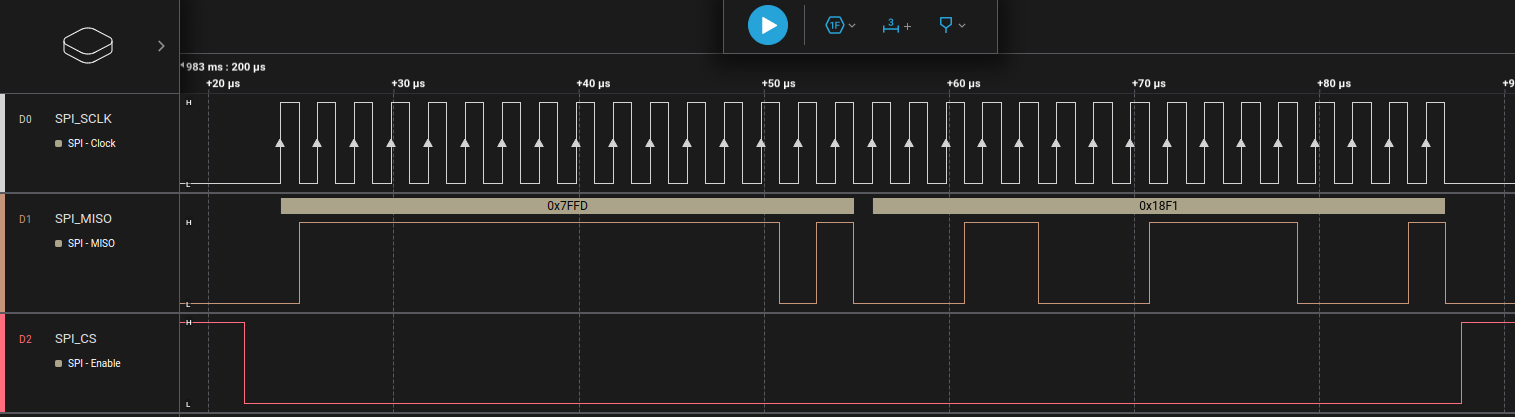
If you are measuring some strange digital voltage levels, such as short and small spikes, the first problem could be your settings on the Sale Pro models, which have configurable threshold voltage levels.
Example Error Situation
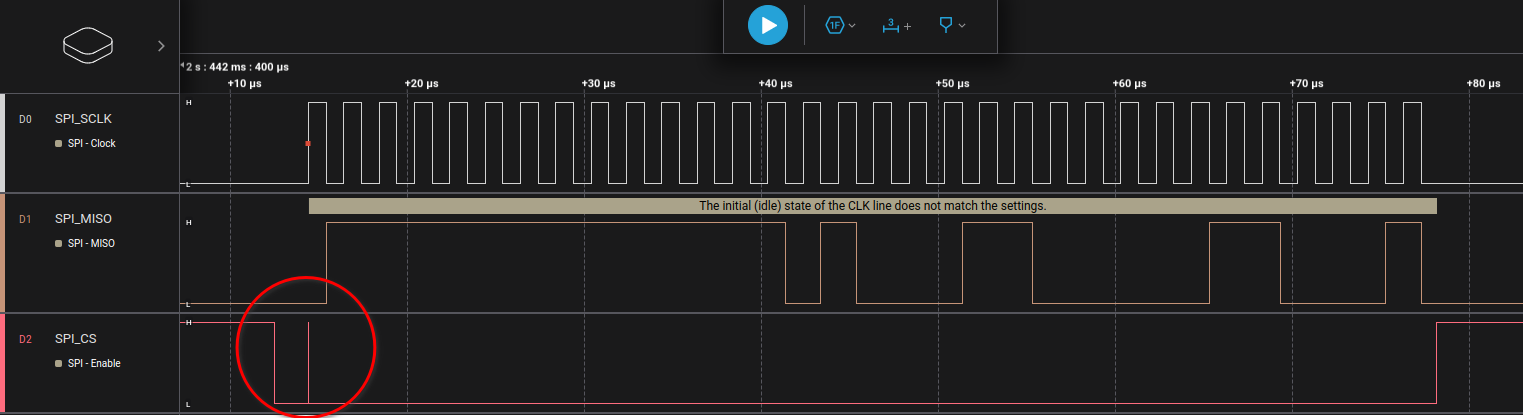
SPI measurement error of incorrect interpretation of chip select pin.
Set the correct voltage level for your hardware in the channel selection menu.
Setting Threshold Voltage
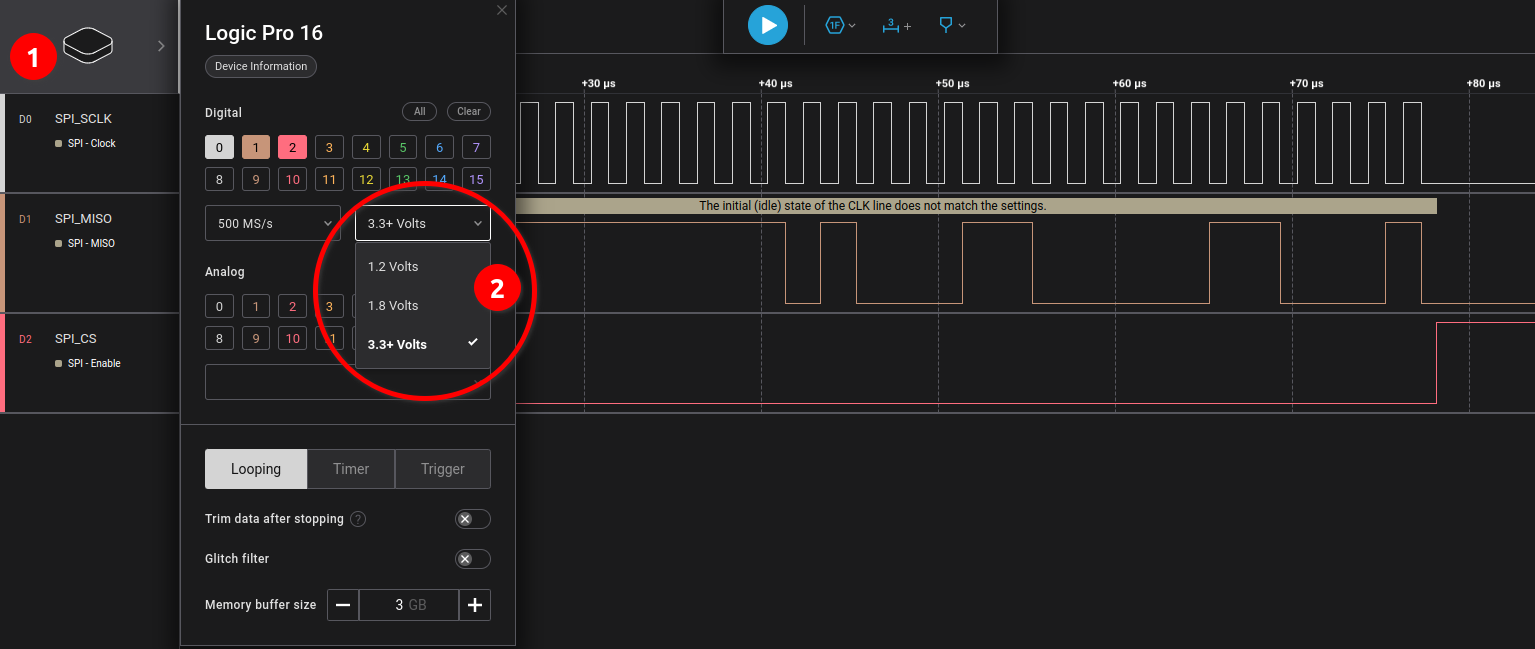
Go into the channel select menu.
Change the threshold voltage to the current system voltage.
The selectable levels have an effect on the measured digital values.
Voltage level |
Threshold voltage |
|---|---|
1.2 Volts |
0.6 V |
1.8 Volts |
0.9 V |
3.3 Volts |
1.65 V |
Note
The selected threshold voltage is set for each channel.
The result is that the logic analyser now correctly interprets the voltage levels and recognises the SPI bus example without changing any source code on the MCU.
Setting Threshold Voltage
Correct SPI measurement without Saleae threshold error.