STM32 development with VS Code
VS Code offers a development environment for several programming languages and additional services. The free application is also widely used and has a large community. Therefore it is recommended to use VS Code for STM32 development instead of the STM32CubeIDE provided by ST Microelectronics.
Additional packages are required to use VS Code with CubeMX. In general, CubeMX and VS Code are available for all major operating systems.
Applications
Visual Studio Code
Download VS Code for your operating system from the official website visualstudio download. If you are a GNU/Linux Debian/Ubuntu user, you can also download it from the terminal.
Linux Debian/Ubuntu VS Code
Install meta packages and https enabled apt
sudo apt install software-properties-common apt-transport-https wgetImport the Microsoft GPG key using the following wget command :
wget -q https://packages.microsoft.com/keys/microsoft.asc -O- | sudo apt-key add -Enable the Visual Studio Code repository:
sudo add-apt-repository "deb [arch=amd64] https://packages.microsoft.com/repos/vscode stable main"Install the Visual Studio Code package:
sudo apt install code
Install snap:
sudo apt install snapInstall VS Code
snap install code
CubeMX
Download the CubeMX installer from moodle or the official website for your preferred operating system. (Recommended for VM)
Installation from official website
Download the CubeMX application from the official website STM32 CubeMX Download. You will need an ST account to download. You can use your student email for verification.
Unzip the file and run the installer. See the Saleae Download and installation for Linux users on how to install. (It shows the procedure for installing the saleae application.)
ST-Link Utilities
The ST-Link driver is used to flash and debug the MCU. Install it for your operating system:
sudo apt install stlink-tools
Install stsw-link004 from moodle or from official website: ST-Link Utility Download.
Install driver from mac ports stlink.
sudo port install stlink
VS Code Extensions
The following extensions are needed.
You can install them via the extension menu or directly in the VS Code Explorer, which can be opened with Ctrl P.
Install extension stm32-for-vscode
ext install bmd.stm32-for-vscodeInstall extension Cortex-Debug in VS-Code
ext install marus25.cortex-debugFor more comfortable c-programming, we recommend installing the extension C/C++
ext install ms-vscode.cpptools
All necessary programs such as the compiler, on-chip and GNU debugger are installed with the VS Code extensions. The location of these programs is in the VS Code extensions path. They can also be installed on the system to ensure that you are always using the same version.
Note
Installing local programs
Install the GNU ARM Embedded Toolchain from ARM Toolchain for your operating system or use the debian package:
sudo apt install gcc-arm-none-eabiInstall Open On-Chip Debugger OpenOCD download, for debian/ubuntu users:
sudo apt install openocdInstall GNU Debugger Download (with support for multiple architectures), for debian/ubuntu users:
sudo apt install gdb-multiarch
Erros in STM32-For-VSCODE
Normally, no special configuration is required to use the STM32-For-VSCODE extension. In case of errors, here are some hints on how to configure your system correctly. Check your error in the following order:
Compiling Check if you can compile your project in VS Code in the ST Extension window and press
Clean build. Compiling is the basic requirement to use VS Code for STM32 programming.STM32-For-VSCode extension is not visible
Make extension visible
Install the extension
Open the project in the root directory of your project (where the Makefile and the IOC files are located)
No compiler found:
Set compiler path
Add the correct path, where your amr-none-eabi-gcc is located. There are two possibilities to set the path.
Open the VS Code settings with
Ctrl ,, search forStm32-for-vscode: Arm Toolchain Pathand set in the field the correct path. This path will be used as default for every project you use on this computer, but can be overwritten with the Workspace settings.Open the .vscode/settings.json file and add the member
"stm32-for-vscode.armToolchainPath":with your path as string. For example:"stm32-for-vscode.armToolchainPath": "/usr/bin"This setting will overwrite the User settings!
Flash STM32 device Check if you can flash your project in VS Code in the ST extension window and press
Flash STM32.Check connection to your MCU
Check the connection to your MCU. Be sure that the MCU is plugged in and recognized by your system. For VM users, be sure that the USB port is routed to your VM. Remember on the USB Settings FAQ how to route an USB port permanent to your VM.
OpenOCD fails
A window pops up with the message: Something went wrong during the build process: 2.
Danger

Install and set OpenOCD path
Check the connection to the MCU as described above, else check your path settings. The path mus be the absolute path to the application openOCD.
Open the VS Code settings with
Ctrl ,, search forstm32-for-vscode.openOCDPathand set in the field the correct path. This path will be used as default for every project you use on this computer, but can be overwritten with the Workspace settings.Open the .vscode/settings.json file and add the member
"stm32-for-vscode.openOCDPath":with your path as string. For example:"stm32-for-vscode.openOCDPath": "/usr/bin/openocd"This setting will overwrite the User settings!
Debug STM32 device Check if you can debug your project in VS Code in the ST extension window and press
Debug STM32.GDB Path Settings
Danger
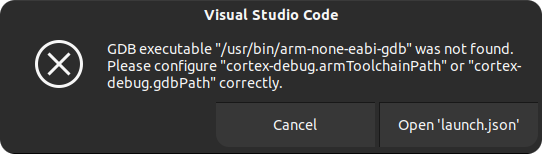
GDB Path Settings
As the error message indicates, your path or name is incorrect to find the gdb application. You need to determine the location and name of the downloaded GDB application. Usually the gdb-multiarch application is used. Once you have found the application, set the correct path:
Open the VS Code Preferences with
Ctrl ,, search forcortex-debug.gdbPathand enter the correct path in the field. This path will be used by default for every project you use on this computer, but can be overridden in the workspace settings.Open the .vscode/settings.json file and add the member
"stm32-for-vscode.openOCDPath":with your path as a string. For example:"cortex-debug.gdbPath": "/usr/bin/gdb-multiarch"This setting will overwrite the user settings!
GDB does not exist
Danger
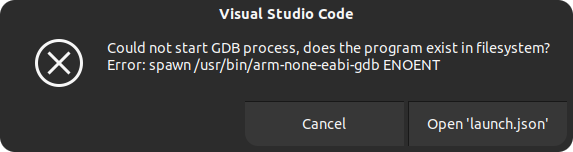
Install and set GDB path
It has the same error source as the GDB Path Settings. Be sure that GDB is installed. Have a look in
Install local programsin section VS Code Extensions for more information about the GDB application. Use the solution from GDB Path Settings to set the correct path.No register access in the debugger
The debugger starts as usual, but the
XPERIPHERALSsection is not visible or no registers are displayed.No register access in the debugger
The debugger needs an SVD file describing the registers and their positions. Follow the steps below to download and link the SVD file for a STM32F446re controller.
Download the SVD file
The System View Description (SVD) file defines the addresses of the peripherals and the functionality of the corresponding registers and bits for debugging. It is provided with the CMSIS package. You can download it from the CMSIS package page CMSIS STM32F446 package and extract the SVD file for your MCU or download it here:
STM32F446.svdMove the SVD file into the root directory of your project.
Add the SVD file into your configuration.
The launch.json file in the .vscode directory must point to the SVD file. Add the svd file path attribute to both configuration entries:
"svdFile": "STM32F446.svd"Note
Remember to add a comma at the end on the previous line since it is a comma separated list.